VB.NET, Windows

FileSystemWatcher Class in VB.NET


FileSystemWatcher in VB Example

FileSystemWatcher in VB Example

Just a quick post on using the Microsoft file system watcher component in the .Net framework with Visual Basic. Utilizing the Microsoft file system watcher component in .Net with Visual Basic, you’re able to watch a directory structure for changes to its contents and respond with Visual Basic code.

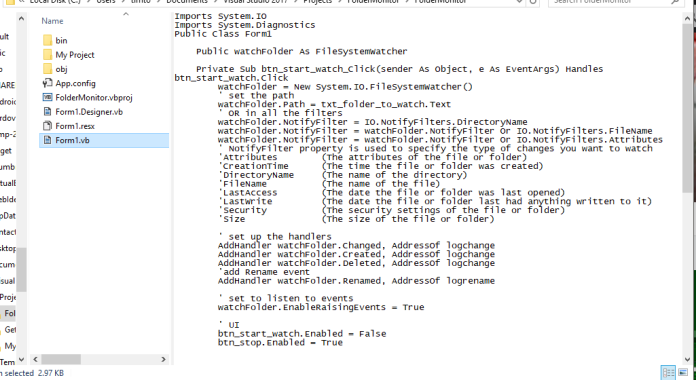
Using the.net file watching component is pretty simple on the surface. Microsoft provides enough example code in their documentation to give any new user a great head start. Basically, to use the file system watcher component you have to first set permissions to full trust, create a new file system watcher object, set its properties, create handlers for the events the file system watcher object raises, and then set it to enable raising events.

When I first started tinkering around with the file system watcher component everything worked as expected. I did, after watching the events closely, come across one caveat. If you set the file system watcher object to include subdirectories, when you delete a subdirectory that has files contained in it the event raised by the file system watcher will only show the event for that subdirectory being deleted not for any of the files contained in that directory. This makes it a bit more difficult to keep track of the directory structure.

My solution was to create a list in order to compare file paths of the files contained in the folder to the path of the sub folder being deleted. Eventually, I found it easier to break this functionality off into a new class that I could adapt for reuse. I felt that using a list to keep track of the folders and files was better for performance then re-parsing the file system every time a subfolder was deleted. I wrote a simple dialog project for demonstration purposes that I’ll post on github so that you can check out the code.


Reference:

https://docs.microsoft.com/en-us/dotnet/api/system.io?view=netframework-4.7

https://docs.microsoft.com/en-us/dotnet/api/system.io.filesystemwatcher?view=netframework-4.7


Example Code on Github

Imports System.IO
Imports System.Security
Imports System.Security.Permissions

''' <summary>
''' Singleton that initializes and handles file watcher changes
''' </summary>

<CLSCompliant(True)> Public Class MyDirectory
    Public Shared Event Change(path As String)
    Public Shared Event Create(path As String)
    Public Shared Event Delete(path As String)
    Public Shared Event Renamed(oldpath As String, newpath As String)
    Private Shared watched As String
    Private Shared retList As List(Of String)
    Public Shared ReadOnly Property Count As Integer
        Get
            Return retList.Count
        End Get
    End Property
    Private Sub New()
    End Sub
    Public Shared Function ListDirectory(path As String) As List(Of String)
        retList = New List(Of String)
        watched = path
        Try
            Dim di As DirectoryInfo = New DirectoryInfo(path)
            For Each file In di.EnumerateFiles("*", SearchOption.AllDirectories)
                retList.Add(file.FullName)
            Next
            For Each folder In di.EnumerateDirectories("*", SearchOption.AllDirectories)
                retList.Add(folder.FullName)
            Next
        Catch ex As DirectoryNotFoundException
            Console.WriteLine("Directory not found: {0}", ex.Message)
        Catch ex As SecurityException
            Console.WriteLine("Security Exception:\n\n{0}", ex.Message)
        Catch ex As Exception
            Console.WriteLine("Exception occurred: {0}", ex.Message)
        End Try
        Return retList
    End Function
    <PermissionSet(SecurityAction.Demand, Name:="FullTrust")>
    Public Shared Sub WatchDirectory(path As String)
        Dim fswatcher As New FileSystemWatcher
        fswatcher.IncludeSubdirectories = True
        fswatcher.Path = path
        fswatcher.Filter = ""
        AddHandler fswatcher.Changed, AddressOf onChanged
        AddHandler fswatcher.Created, AddressOf onCreated
        AddHandler fswatcher.Deleted, AddressOf onDeleted
        AddHandler fswatcher.Renamed, AddressOf onRenamed
        fswatcher.EnableRaisingEvents = True
    End Sub
    Private Shared Sub onChanged(src As Object, evt As FileSystemEventArgs)
        RaiseEvent Change(evt.FullPath)
    End Sub
    Private Shared Sub onDeleted(src As Object, evt As FileSystemEventArgs)
        Dim tList As List(Of String) = New List(Of String)
        Dim thepath As String = evt.FullPath
        For Each path As String In retList
            If path.StartsWith(thepath) Then
                tList.Add(path)
            End If
        Next
        For Each path As String In tList
            retList.Remove(path)
            RaiseEvent Delete(path)
        Next
    End Sub
    Private Shared Sub onCreated(src As Object, evt As FileSystemEventArgs)
        retList.Add(evt.FullPath)
        RaiseEvent Create(evt.FullPath)
    End Sub
    Private Shared Sub onRenamed(src As Object, evt As RenamedEventArgs)
        Dim thepath As String = evt.OldFullPath
        Dim fname As String = ""
        Dim dicRename As Dictionary(Of String, String) = New Dictionary(Of String, String)
        For Each path As String In retList
            If path.StartsWith(thepath) Then
                If Equals(path, thepath) Then
                    dicRename.Add(path, evt.FullPath)
                Else
                    fname = path.Substring(path.LastIndexOf("\") + 1)
                    dicRename.Add(path, evt.FullPath & "\" & fname)
                End If
            End If
        Next
        For Each KVPair As KeyValuePair(Of String, String) In dicRename
            retList.Remove(KVPair.Key)
            retList.Add(KVPair.Value)
            'Console.WriteLine("Renamed from: {0} \n To: {1}", KVPair.Key, KVPair.Value)
            RaiseEvent Renamed(KVPair.Key, KVPair.Value)
        Next
    End Sub
End Class

Standard
VB.NET, Windows

Synchronous Delegate in VB.NET

I didn’t know why I would need one either until the need came up (“Oh no, my UI is on a different thread!”). Delegates are described as similar to function pointers in C++ in the Microsoft documentation. When I read that I said to myself “yeah, but Visual Basic doesn’t work like that wonderful and painfully frustrating language that AT&T invented so long ago”. So Microsoft still has to learn that Chinese is painful if you’re not from China. I’m discovering in the new VB, it does kinda work like that – a little.

In my case I had a shared class and a form that were working together. My class raised an event that was handled on the form to update a control on the form. The event also had parameters that were passed with the event to the event handler on the form. When the handler was invoked I received an exception that stated the control I was accessing was on another thread. I didn’t have to deal with this in the old VB under ‘normal’ circumstances. If I did I would have to be the C++ programmer working in VB – and that would have been considered a work around at best. So this is vast new territory for me, and I apologize ahead of time if something isn’t perfect. And yes, its a Windows Forms project with no XAML.

So… How To

Conceptually, you have to create a Delegate (a function pointer in C++) for your method (yeah, the one that updates the control) that gets used (dereferenced and called) by the user control Invoke method which invokes the method (yeah, that one) on its thread. On an aside, don’t ask why I think Microsoft put a C++ programmer in charge of Visual Basic NET. However, I’m taking the bad with the good here – the new Thread way is really powerful in my opinion. I just really would have preferred this kind of ‘icky’ stuff to be abstracted away. I guess you can’t have that multi-thread evil at Microsoft with VB without a bit of ‘ick’. In other words, I can’t help but to be critical; it’s still kind of ‘hakish’ if you ask me.

OK, as I stated earlier, the event was handled on a form to update a control on the form. The first thing to do is to declare a Delegate at the top after the opening of the form class. The declaration is similar to an interface declaration in that there is no body to the declaration, just the function (or method) signature. Name the Delegate something like controlUpdateDelegate. Now go and code the controlUpdate method, which should be easy considering its probably the same code you wrote in your original handler. Now, in the original event handler, you’ll need to start an If block that tests for the control you’re updating InvokeRequired property (no autocomplete from the IDE unfortunately). If that boolean is true you have to create a New Delegate (updateControlDelegate) with the AddressOf the function you wrote to update the control (controlUpdate). After that you have to call that controls (the one you’re updating) Invoke method with the Delegate you created and the parameters you originally sent to the event handler. If that InvokeRequired boolean is false just call that method you created.

That’s it – that’s what worked for me.

Some Example Code Structure

' on the form is someControlPublic 
Class someForm
 Public Delegate Sub controlUpdateDelegate(someParam as String) 

 Public Sub New()
   AddHandler someClass.coolEvent, AddressOf  coolEventHappened
   someClass.doSomethingCool()
 End Sub

 Private Sub coolEventHappened(someParam As String)
   If someControl.InvokeRequired Then
     Dim del = New controlUpdateDelegate(AddressOf controlUpdate)
     someControl.Invoke(del, someParam)
   Else 
     controlUpdate(someParam)
   End If
 End Sub

 Private Sub controlUpdate(someParam As String)
 ' update someControl here with someParam
 End Sub
End Class

Public Class someClass
  Public Shared Event coolEvent(someParam As String) 

  Public Shared Sub doSomethingCool() 
    RaiseEvent coolEvent("Cool!") 
  End Sub

End Class.
Standard
VB.NET, Visual Basic, Windows

Getting System Information With WMI and VB.NET

35608522201_0687ca50aa_o

Machine Information app

I’ve been getting back into developing with Visual Basic lately. I’ve learned much of what I need to know in the past while in college; or so I thought. Much has changed since those days of Visual Basic 6. Everything is done a bit differently now using dot NET. Before, everything was Component Object Model components – and I really liked Visual Basic 6 for making it easier to develop those type of components. ActiveX controls, servers, hell – even application documents that ran inside of Internet Explorer was just easier to develop with VB than anything else. The Visual Basic runtime dll was in charge of running a lot of business infrastructure in the past.

Now a days its the mighty ubiquitious framework called Dot Net that drives business development. Made up of a huge collection of classes, dot NET is central to every language that runs on Microsoft. Even C++ developers write managed code these days. Instead of a runtime dll we get the Common Language Runtime, which interprets code written in any Microsoft language and churns out a bit of Intermediate Language that runs on a virtual machine. While its true that almost everything I am doing in VB now is a learning experience I see the value in this managed code base already; a lot just got easier.

One of the wisest decisions Microsoft has made recently was the release of the Community Edition of Visual Studio. A corresponding version of Microsofts flagship IDE used to cost a fortune in the past. Now, for the lone developer, its free to download and code with – great! All the code here is written and compiled with this IDE so download it and give it a try.

35570506482_ca1635cb8f_o

Explicitly adding the System.Management assembly reference to my project

Getting system information by querying into the Windows Management Instrumentation system isn’t that difficult. Setting up the project to use the namespace was out of the ordinary – you have to explicitly add the reference to the System.Management namespace assembly to the project. There will be no help from the IDE with this. So you have to go to the Project properties page, click on References in the left column, hit the Add button, click on Assemblies->Framework in the left column, go down to the System.Management namespace and make sure the checkbox is checked. The same goes for the System.ServiceProcess namespace if you’re going to look at the running services as I have.

Basically, I’ve been working off of Microsoft code examples to get to where I am with this. To query WMI you set up and use a ManagementObjectSearcher class with your query and then iterate over the results. The sample application turns the query results into a List of string Dictionaries. Most of the time you’ll want to do a custom query to retrieve the specific information you desire instead of returning entire classes of information the way I have in the example application. Also, the queries take time more time than you might be used to, and this may become a problem. Using a separate thread to run your queries will improve response time. For instance I get a ContextSwitchDeadlock Exception if I do not run the Product query on a separate thread.

Why do the application at all? The one problem I have had is remembering the exact members of the different WMI classes I am querying for. The example app returns the entire class, or array of classes, with null values turned into empty strings for reference sake. It should be enough to get anyone started with building and testing the exact query they need.

There are dozens of scenarios where you would want to glean a bit of information from the System.Management namespace. Hopefully this example can help you on your way.

Download Links:

MachineInfo.exe

Entire Project on GitHub

References:

Standard
Explorer, registry, Visual Basic, Windows

Preview File Types as Text in Preview Pane in Windows Explorer on Windows 10, 8, 7, and Vista

35321504842_fd27e533ef_o

Visual Basic file shown in the preview pan in Windows Explorer (file from the tutorial here)

If you use Windows the way I do you use the Windows Explorer Preview pane to look at text based files. Why? Because it’s just easier that way. Most of the time I have to look back at files to see exactly how I pulled something off in the past. If it wasn’t for the preview pane I would have to open that file up in whatever editor is associated with it. That takes more time.

Setting the preview pane to view a filetype as text is as simple as setting a couple of registry keys. The average user really shouldn’t alter the Windows Registry without knowing what they’re doing as it could render the system unusable. There’s a registry script that can be altered for any file type at the end of the post.

The new, more modern “Windows 10”, way of setting the preview pane to show a filetype as text is by setting two string subkeys on the filetype in HKEY_CLASSES_ROOT. Setting the subkeys “Content Type” to “text/plain”, and “PerceivedType” to “text” usually works for most filetypes. This worked like a charm for my “.json” problem.

However, that isn’t always the case as I found out when tried to preview a Visual Basic filetype. I just expected it to work because I have the most recent version of Visual Studio installed on my system.  So, once again, I opened up REGEDIT and looked at the “.vb” key. I discovered the two previously mentioned subkeys were already set properly.

After trolling the Internet (for too long I might add) I discovered the “old” way. There is another key that needs to be set on the filetype in the Registry. You have to add a special GUID key to the “shellex” key below the filetype and set that with another special GUID (which I assume is the GUID for the Preview Handler for text files). The old way worked for me.

The registry script is set up to set all of these keys. Yeah, the dead keys might add a teensy bit to the Registry size – so it’s opinionated. It’s better to have everything in one place than not. Do I think programmers that invent a new text based filetype for their apps should set these keys? Absolutely, if they’re not going to write a Preview Handler shell extension.

Just replace the “.vb” extension to whatever filetype you want to preview as text.

Download

Windows Registry Editor Version 5.00

[HKEY_CLASSES_ROOT\.vb]
"Content Type"="text/plain"
"PerceivedType"="text"

[HKEY_CLASSES_ROOT\.vb\shellex]

[HKEY_CLASSES_ROOT\.vb\shellex\{8895b1c6-b41f-4c1c-a562-0d564250836f}]
@="{1531d583-8375-4d3f-b5fb-d23bbd169f22}"
Standard
Analyze-It, Browser Extension, CEH, Google-Music-Search, Google-Open-Storage-Search, Google-Translate-It, Internet Explorer, Look-It-Up, Plurk-It, Share-It, Visual Basic, Wikipedia-Search, Windows

Internet Explorer 11 Context Menu Chooser Application Version 3

Internet Explorer 11 Context Menu Chooser Application Version 3

Internet Explorer 11 Context Menu Chooser Application Version 3

This is an application that allows you to pick and choose which of the many context menu add-ons you would like enabled in your browser. Internet Explorer does not support nested context menus so this I wrote this application to make it easy to enable and disable different menu items you may want to use (instead of separate scripts). The context menu items are broke up into 8 groups: Share-it, Analyze-it, Analyze-it-Scritch, Analyze-it-Viewdns, Plurk-it, Google-it, Look-it-up, and IE-Utility. The IE-Utility menu items are usually located in the Tools menu in the menubar on top which isn’t shown by default (just hit the Alt key and it will pop open temporarily).

There are also a couple of registry tweaks that I included in this application. One that adjusts the size of the thumbnails (on hover) of open applications on the taskbar. And another to give you more New Tab entries. There is also a reset button for the New Tab items you removed and want back. The New Tab functionality is generated automatically based on your browsing (you don’t get actual Speed Dial functionality – Internet Explorer chooses everything you see)

There are a few changes in this new version that should be mentioned. The user interface has changed, the code was ported to be compiled, and there is now a version check that will help keep the application current.

In this version the user interface has been changed to be more convenient. I traded the scripted multi-screen interface for a more basic checkbox based dialog written using WinForms. Its just easier to use having everything in front of you on one dialog while making choices.

The code was ported from jscript/hta to nice modern Visual Basic 14. This should improve application start up time as well as use less memory while running. This compiled version of the application will perform better overall.

The scripting run time has a large overhead and is not maintained by Microsoft as other technologies are. For instance, when scripting a hypertext application the jscript has to target Internet Explorer 4/5 by default. By changing properties on the hta you can target IE8. I would have considered keeping the application scripted if Microsoft ported the hypertext application system to use the Edge or Internet Explorer 11 runtime.

Internet Explorer 11 Context Menu Chooser Application Version Check

Internet Explorer 11 Context Menu Chooser Application Version Check

There is now a version check enabled in the application. This application uses many external tools and features that are completely out of my control. As such, I’ve founds the application needs to be updated more often than other projects I’ve coded. In an effort to keep the application current I enabled a version check that checks weekly in the background that will somewhat automate the process of upgrading. By pressing the “Install new version” button the application will download the updated application in the background (no browser needed) to the Temp folder and start the installer.

The installer has also been tweaked to automatically start the old version uninstaller application (if it detects one) instead of the “do or die” message box that used to pop up. As there is a dependency on .NET 4.5, the installer will detect and start the web installer for the .NET framework as needed (this should only happen in Windows 7 without .NET 4.5).

Why write and maintain this application if Edge is the newest thing? Because desktop users will still prefer Internet Explorer 11 over Edge. Because I can’t see Microsoft having the only browser not running plug-ins. Because its still included in the operating system.

Where is it? Microsoft Internet Explorer 11 is located inside the Windows Accessories folder on the Windows 10 Start Menu. Or you could just click on the symbol in the upper left corner of my application.


Download Internet Explorer 11 Context Menu Chooser Application Version 3

Standard
Theme, Windows

MilSpecGreen Windows Theme

MilSpecGreen Windows 10 Apps

MilSpecGreen Windows 10 Apps

This is a high contrast theme that I can actually endure using late at night without getting frustrated. This theme works great on Windows 10 and Windows 8. I even did a version for Windows 7 to make all of my systems match. Hope you get some use out of them. The download links and screenshots are below.

MilSpecGreen Windows 10 Start Menu

MilSpecGreen Windows 10 Start Menu

Sore eyes caused me to create this theme. I actually didn’t want to create a theme at all at first. All I really wanted to do at first was to change the background color of Windows Explorer by changing values in the Registry the way I had in previous versions of Windows. Now, in Windows 10, that’s a no-go. I guess that’s why many of these little tweaks were never officially documented in the first place.

There are applications out there that will change the colors of everything on the operating system. Microsoft should already have all of these color settings available to me – not just in high contrast mode. Refusing to purchase one of those skinning applications, I searched around the Internet and found no simple answer. Some recommended that I stop using Explorer and use something else! Windows Explorer is the shell of the OS, anything else just rides on top of it adding overhead. The best answer I came across was in a Windows 10 forum that told me to customize a high contrast theme. So I did.

MilSpecGreen Windows 8 Start Screen

MilSpecGreen Windows 8 Start Screen

Customizing A Windows High Contrast Theme

Microsoft has included a couple of high contrast themes in every version of their OS, none of which I could bear looking at for more than the minute it took to decide that I didn’t like what I was looking at. Customizing a high contrast theme isn’t hard at all: just save a high contrast theme for sharing by right clicking on it in the theme picker, unzip the theme you saved with a program such as 7zip, change the colors in the theme file in the root of the unzipped folder, open the theme file you edited up by right clicking on it and hitting the Open menu item, then save it for sharing all over again. The colors are in the [Control Panel\Colors] section and are RGB values that range from 0 to 255 that are separated by spaces. There’s probably a way to do it with the settings dialogs too – but who wants to deal with that? Not too tough – anyone can do it.

Windows 8 Desktop Apps

MilSpecGreen Windows 8 Desktop Apps

My IE11 menu chooser works in high contrast mode except for the selection highlighting; which rots. I’ll be putting a checkmark glyph to indicate selection in the next version. If you’re using my app just hit reset and choose what you need over again if you get confused. Everything works perfectly except for the fact that selections aren’t indicated. My apologies for the inconveniences if any.

MilSpecGreen Windows 8 Tablet Browser Mode

MilSpecGreen Windows 8 Tablet Browser Mode

Internet Browsing

You’re probably going to want to browse with one of the Microsoft browsers when your eyes are really sore as they are probably the most readable in high contrast mode. Firefox and Seamonkey actually work in high contrast mode but aren’t as readable as Internet Explorer or Microsoft Edge in my opinion. Google Chrome will detect high contrast mode and offer their addon and a dark theme that doesn’t match this theme, So you’re probably better off leaving Chrome alone for normal (not high contrast) browsing. (Chrome only asks once) Opera is just Opera with high contrast chrome. The screenshot I provide shows that Opera has no address in the address bar – this is fixed in Opera Next (beta, developer…) at the time of this writing so its probably fixed in the main release if you’re reading this in the future.

MilSpecGreen Windows 10 Browser Comparison

MilSpecGreen Windows 10 Browser Comparison

PDF Viewing

You may also want to use Microsoft Edge to view your PDF files instead of Adobe Reader. Adobe Reader displays PDF files with the color settings that were set in the file. Edge will display the PDF with a theme colored background and text making it easier on your eyes.

MilSpecGreen PDF Reader Comparison

MilSpecGreen PDF Reader Comparison

Customizing The Command Prompt

Surprisingly, using high contrast mode does not change the command prompt in any way. If you want the command prompt to match the theme you’re left with the task of changing the defaults yourself. Its easy to do by clicking on the program icon in the upper left corner of the opened window and choosing the Defaults menu item.

Customizing the Windows 10 Command Prompt

Customizing the Windows 10 Command Prompt

The Annoying Things That Are Beyond This Theme

The button chrome in Windows 7 Media player and Photo viewer has a black background and white text (see Windows 7 screenshot). If you use these “classic” versions in Windows 10 it will unfortunately look this way as well. There is probably a setting for these colors somewhere inside of the registry.

MilSpecGreen Windows 7 Apps

MilSpecGreen Windows 7 Apps

MilSpecGreen Windows 7 Start Menu

MilSpecGreen Windows 7 Start Menu

The shortcuts on the desktop in all versions of this theme have white text that turn green when hovered over. In my opinion the shortcut text should be bright green like the rest of the theme.

Some Application Frameworks Are Not High Contrast Enabled – Adobe AIR Transparency and System Menus Are

The boxes outlining some of the taskbar and system tray icons on Windows 10 seem to be a fact of life indicating high contrast mode.

MilSpecGreen Windows Start Screen All Apps

MilSpecGreen Windows Start Screen All Apps

MilSpecGreen Windows 8 Weather Animation

MilSpecGreen Windows 8 Weather Animation

Download Links

Download MilSpecGreen Theme For Windows 8 and Windows 10

Download MilSpecGreen Theme For Windows 7

Standard
Windows

Windows Admin Command Prompt Here and Desktop Shutdown Menu Items

Just a couple of Windows tweaks scripted into nice small nullsoft installers for convenience. This way if you want to remove them at any time in the future you just uninstall them as you would any other program, Although they were scripted on and for Windows 10, they should also work for all older versions of Windows as well.

Admin Command Prompt Here Menu Item

The Admin Command Prompt Here menu item will appear when you right click on, or inside of, any folder in Windows Explorer. It provide you with an elevated command prompt when you click on it. If you’re in the business of using command line tools often this menu item is a real time saver.

Download Installer Here

Desktop Shutdown Menu Item

You know what’s nice? Right clicking on the desktop and clicking on the Shutdown menu item to exit Windows. If you’re on a desktop system you’ll never stop using this one.

Download Installer Here

Standard
Analyze-It, Browser Extension, Internet Explorer, Javascript, Look-It-Up, Plurk-It, Share-It, Windows

Internet Explorer Context Menu Chooser Application Version 2

Analyze-it menu chooser

Analyze-it menu chooser

With this new version the Analyze-it context menus were updated to the most recent version. Analyze-it contained so many menu items that I had to add a counter to the interface to indicate when there are more than the twenty menu item visible limit. The menu counter is only active for page context (basic context menu the page provides – nothing selected in other words) menu items. I suppose when there are more than twenty selected text context menus I’ll have to add another one; this is good for now. The counter only indicates when you are over the visible limit, it doesn’t prevent you from going over, which helps you fine tune your choices.

Analyze-it context menus

Analyze-it context menus

I had to break out Analyze-it into three logical, domain based sections, making it easier to choose the menu items you would like to use.

Analyze-it-Scritch menu chooser

Analyze-it-Scritch menu chooser


Scritch menu items

Scritch menu items

Scritch.org has its own section in the application now, making it easier to discern their tools from the rest.

ViewDNS menu chooser

ViewDNS menu chooser

ViewDNS provides a group of helpful online tools on their site that I have included menu items for in this release. The application is now up to date with my other add-ons hosted in various places. Again, if you are running a tablet exclusively, this application isn’t for you. This application is used with Internet Explorer not Microsoft Edge (the tablet browser included with Windows 10) . If you are on a Surface device and if you use Internet Explorer with your keyboard and mouse – this will give you extra context menus.

ViewDNS menu items

ViewDNS menu items

There is a newer version available – see post here

Standard
Windows

This is My Take on Windows 10 Technical Preview

New Start Menu

I had the opportunity to try out the Windows 10 Technical Preview recently and I was happy to see that the Start menu has returned with a facelift of sorts. The Start menu on Windows 8, as we all know, was changed to suit a touch interface. This was really great for their premiere surface tablet line up – but for desktop users without touch functionality this left a lot to be desired.
Personally, I do far too much on my system to even be able to rely on a touch interface at this point. The keyboard and mouse will not be going away any time soon in my life. Its shameful that Microsoft made the assumption that everyone would prefer that type of, non-selectable I might add, interface. Why shameful? I learned user interface design from Microsoft and MSDN while I was learning Visual Basic 6 eons ago – they have a tremendous investment in it that was ignored in Windows 8 (unless you’re a tablet user that is).

Application Menu Scrolls – Live Tiles Never Disappear

Enough of my ranting; Microsoft is fixing the Start menu problem now. Albeit, you’ll have to pay for a new version. There are other, less spectacular improvements on the way as well.
Windows users will have the opportunity to set up multiple desktops and switch between them. Granted, most Linux users have had this feature enabled on their desktops since the dark ages – now Windows has it.

Multiple Desktops Now

Window snapping has also been improved with selectable stacking (or tiling) with more than two windows. In the preview version I was using there was gaps between the snapped windows that made it less desireable. I have to assume that this will be remedied by the release date however.
I would have really liked to put Windows 10 through a couple of months of hard usage but my Nvidea drivers refuse to install as the version number is unrecognized by the driver installer. So I shouldn’t say I had the full “user experience” when I tested it. (Everyone knows – no video drivers = poor computing experience). Still, overall, it ran as well as Windows 8 on my box.
Windows 10 is still a work in progress. In my opinion it has a long way to go before they should actually call it a new version. It’s still Windows 8 with a facelift that suits desktop users in other words.
The technical preview is requesting that you (the tester) submit your views and opinions as you use it. That’s probably the most important improvement – the user opinion factor. So if you have an extra box laying around that you use for testing – try it. Put your two cents in and try to make the OS a bit better in the end.

Standard