CodeProject, Explorer, iPod, Microsoft, Music, VB.NET, Visual Basic, Windows

GetMyMusicOffOfMyIpodAndOntoMyComputer Application in VB

getmymusicoffofmyipod-open-graph

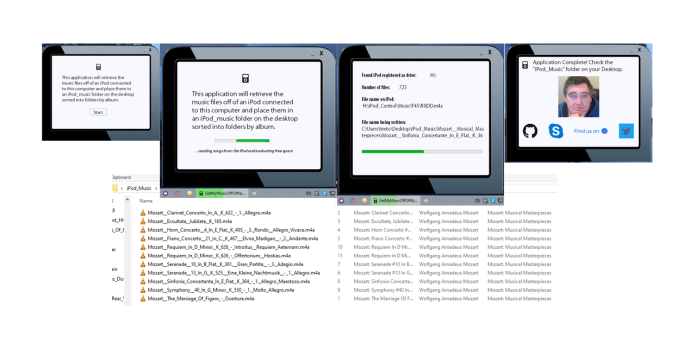
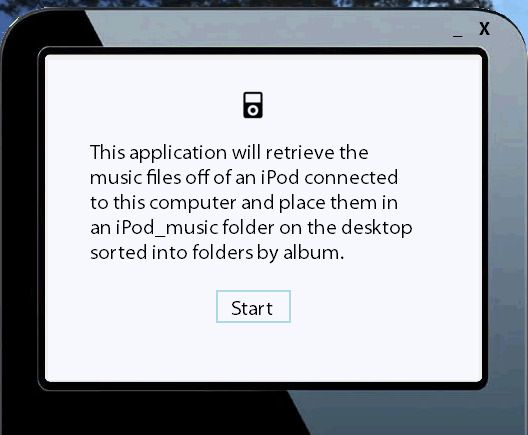
Originally this application was a console application that I developed to get the music off of my iPod. After my post on transparent forms in Visual Basic I decided to port it to a Widget format to make it easier to use and demonstrate what goes into creating a transparent Windows Forms application…

Necessity Drives Innovation – The Need For This App

Let’s start with the music eating iTunes application. My iPod is the only music player that I have ever owned that does not make it easy to get my music files off of. Even the very cheapest music player you can buy allows you to get your music off of the device easily. If I want to play the music on my computers’ speakers I get a purchase driven interface that concentrates more on selling me something than anything else.

OK, enough applesauce for now. Suffice it to say, I like my iPod – I just don’t like iTunes. I needed to get my music files off of my iPod so that I could play them on my computer without tying up a USB port. I would rather run my code than anyone else s’ on my computer – so an application was born. This application does only one thing without any other options, so it’s a sure fire shoe-in for a widget.

Creating The Background For The Application

ipod_start

My transparent forms application startup screen.

In my opinion, transparent forms applications are really only good for developing widget style application. So the background image you choose should be relatively small. However, with modern new tablet/hybrid systems your interface should be designed to handle both desktop/laptop and tablets. Think small form size with big buttons that are easy to pluck at with your digits. Also, your application should stay the same size (width and height) throughout execution.

Visual Studio will automatically tile whatever image you choose for your background on the form designer by default. This will help you with the layout for the multiple panel interface you will most likely need to come up with. The size of your interface (form) should be the width and height of the tile in the upper left corner of the designer. 

ipod_tiles_background

My application background tiled in the forms designer with the panels in place.

You should create as many panels as needed to hold the different UI states of your app inside of the different tiles. The tiled background gives you a chance to see what your app states UI will look like as you design them. Use the upper left tile inside of the designer to place your designed chrome buttons (min,  close etc…). Like I stated earlier, your interface should be panel based to make it easier to swap them out between application states. Simply take note of the size and location of the panel in the upper left corner tile and swap out panels assigning those values to the other panels as you need to in code. 

Beyond that, read my previous post on transparent forms for more info – it’s an easy and short read through.

Adding Modern Application Features

Windows forms applications lack some of the more modern features that their XAML based counterparts come with out of the box. One of those features, specifically the taskbar based progressbar, can be added to any winforms application with a quick visit to Nuget.

nuget_shell

WindowsAPICodePack in the Nuget package manager.

Being able to see the progress of a long running task while the application is minimized is an important feature for an application such as this. So, with the Nuget package manager opened, search for WindowsAPICodePack and add it to your project. That package gives you all of the code pack API goodness you’ll need to implement that taskbar progressbar functionality. Coding it is pretty much like coding a regular progressbar. You just have to Import the taskbar library from that package in your form and use it.

Most of the time you’ll be coding something like:

TaskbarManager.Instance.SetProgressState(TaskbarProgressBarState.Normal)
TaskbarManager.Instance.SetProgressValue(somecountingint, somecountedint)
' update somecountingint till done
TaskbarManager.Instance.SetProgressState(TaskbarProgressBarState.NoProgress)

Take a look at the file on Github to see how I coded everything.

Recovering Music from an iPod in Visual Basic

ipod_copying

Most of the music files on my iPod were imported from CD which iTunes turns into .m4a files instead of .mp3 files. The extended properties are the same in both cases however.

Recovering the music from an iPod involves reading the extended properties from the music files themselves (which is what the iPod uses). The music files on the iPod itself are contained within a hidden folder named “iPod_Control\Music” (on my iPod video). My code enumerates the connected external drives and searches for the existence of that folder. Inside that folder there are a bunch of randomly named folders – your music files exist in those folders, randomly named of course.

Getting the extended property values turned out to be a bit more daunting than I first thought. I searched to internet and came across a good stackoverflow post that helped me. That code gave me problems – so it wasn’t as easy as cut and paste, but it “got the job done” in the end.

ipod_winexplorer

Windows Explorer doesn’t use the Shell – it IS the graphical shell of the Windows OS.

I used the Windows Shell to parse out the extended properties of the music files and used those values to rename and sort them. I wrote a class to hold all of the information about the music files as I parsed them and made it sort-able by implementing the IEquatable and IComparable interfaces on it. See the file on GitHub to see how I coded it.

The About Page

ipod_complete

When the application completes an about pane pops up with my information. Do I use PictureBox controls with the pointer set to a hand for all of my links? You bet I do! It’s probably the easiest way to get an Internet shortcut in your Visual Basic application. Don’t forget to code the PictureBox.Click handler to open the default browser with my URLs.

Dim strUrl As String = "https://someniftywebaddressgoeshere.something"
Process.Start(strUrl)

What This Application Does Not Do

This application just copies the music files into the folder on the desktop. It doesn’t copy any album art or anything else other than the music files. Also, none of the files on the iPod are altered in any way.

ipod evaluating

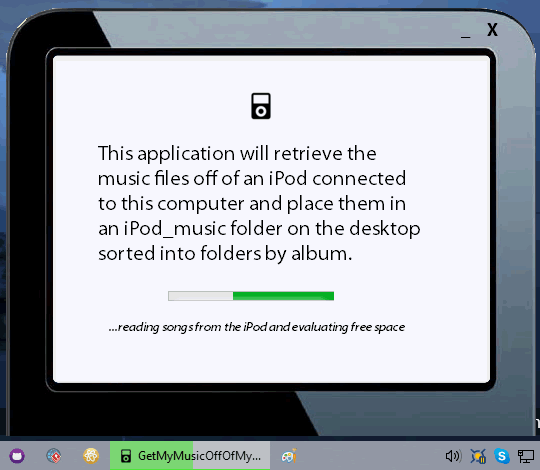
Evaluating the music files on the iPod takes an excruciatingly long time in my opinion. Everything is being done over a USB wire and it takes a toll.

On Porting and Portability

Most of the code can probably be moved to .NET Core 3 without a problem by removing all of the Windows specific code such as the Taskbar Progressbar code. The problems come in when you try to port the code used to read the extended properties of the music files. I’ve read that there is a way to make the code portable by using the actual byte offsets of the extended properties on the files to get the values. Maybe I’ll experiment with that at a later date. But for now, not experimenting with byte offsets seems the wisest and less frustrating path to take for me.


Standard
Microsoft, VB.NET, Visual Basic, Windows

Transparent Forms in VB.NET WinForms Applications

Creating transparent irregular shaped forms in a WinForms applications using Visual Basic is not too difficult. Using a photographic background with a transparent color, a programmer can create some really attractive interfaces. Of course creating an interface sans the standard titlebar chrome requires a bit more work and programming. However, if you want to provide a memorable interface that is attractive as well as personalized – its worth the extra effort required.


Start With a New Windows Forms Application

A few form properties need to be changed before your application form is ready for your photographic background. You’ll change these properties using the IDE (its just easier than coding).

  • Set AutoScaleMode to None
  • Set the BackColor to something like Lime or any other color that you will notice right away (it shouldn’t show anywhere in the completed application)
  • Set the FormBorderStyle to None
  • Set the TransparencyKey to White or whatever color you desire to be transparent in your background image (see below)

Create Your Background Image

Your background image should be created with the background color selected in the previous section for transparency in mind. Anything created or painted on the background image using that color will be transparent. So paint the entire background of the image with that color (on its own layer if possible).

Getting the transparency color exactly right in the image can become an issue (as it did for myself in the past). One version of Lime Green isn’t always someone elses version of the same color. Added to this is the fact that there is nowhere to enter or retrieve a hex color value in the IDE at all.

What I do is use the eyedropper tool in Photoshop on a screenshot of the IDE with the TransparencyKey property showing. This way the color is always right and I know I’ll have no problems afterward. Another way of getting it right is to simply use White as the transparency key color. In this case anywhere you would need white inside the interface you would just use an off shade of white instead. Either way you should always set up the TransparencyKey in Visual Studio first.

Adding the required buttons

After adding your background image to the form you have to add at least one button to the interface – the Close button. A minimize button probably wouldn’t be a bad idea eaither. Keep in mind that if you are adding a maximize button to your interface the extra effort that will be required to support it (graphics wise).

Keep in mind that you really don’t have to use the Button control for buttons. You can use any control that emits a Click event. I find using the Label control with the Cursor changed to a pointer is often the easiest way to get the desired effect in many cases.

Coding these buttons is as simple as creating the Click handler function for the button and closing the application or setting the window state.

close button handler

Making the form draggable

Coding the form to be draggable in Visual Basic is a bit easier than most think. Most of the time I create small, widget like applications when I use transparent forms. Applications like these should be easy to move around so I make the entire form draggable. If you are working on something larger the methodology is pretty much the same except for the fact that you’ll be coding it to a specific part of the form (for instance a custom titlebar – you code the extra math) instead of the entire form.

I use one form global to hold the initial MouseDown location on the form which is considered the offset (remember you’re moving the entire form). In the MouseMove event handler you change the Location property by subtracting that offset from the cursor location and setting it. In the MouseUp event handler  you just set the form global to nothing this way it can be used as a check in the MouseMove event handler.

mouse move code

Finally

Although creating a basic transparent form application seems simple at first glance, your project can get complicated quickly. The more functionality you want, the more things can get more tedious. Creating a maximize button means you’ll have to work out horizontal and vertical tiling on the form and certain components. A custom titlebar means more math in the mouse handler functions. If your application has a lot of animations, perhaps the project should be moved to a XAML imterface instead.

Still, if you’re after a custom look and feel for your app – there’s no better start than a transparent form with a photographic background.

Standard
Microsoft, Tiles, Universal Windows Platform, Windows

…This is Next Gen Windows 10 in 2016

…It’s 2018 now and we’ve all been waiting for Interactive Live Tiles. If you ask me, all these feature should have been in the anniversary release. I’m starting to wonder if they’re even going to make it to release at this point. Having the capability to put a miniaturized interface on the Start menu through an expando button can go far in my opinion.

Standard
VB.NET, Visual Basic, Windows

Getting System Information With WMI and VB.NET

35608522201_0687ca50aa_o

Machine Information app

I’ve been getting back into developing with Visual Basic lately. I’ve learned much of what I need to know in the past while in college; or so I thought. Much has changed since those days of Visual Basic 6. Everything is done a bit differently now using dot NET. Before, everything was Component Object Model components – and I really liked Visual Basic 6 for making it easier to develop those type of components. ActiveX controls, servers, hell – even application documents that ran inside of Internet Explorer was just easier to develop with VB than anything else. The Visual Basic runtime dll was in charge of running a lot of business infrastructure in the past.

Now a days its the mighty ubiquitious framework called Dot Net that drives business development. Made up of a huge collection of classes, dot NET is central to every language that runs on Microsoft. Even C++ developers write managed code these days. Instead of a runtime dll we get the Common Language Runtime, which interprets code written in any Microsoft language and churns out a bit of Intermediate Language that runs on a virtual machine. While its true that almost everything I am doing in VB now is a learning experience I see the value in this managed code base already; a lot just got easier.

One of the wisest decisions Microsoft has made recently was the release of the Community Edition of Visual Studio. A corresponding version of Microsofts flagship IDE used to cost a fortune in the past. Now, for the lone developer, its free to download and code with – great! All the code here is written and compiled with this IDE so download it and give it a try.

35570506482_ca1635cb8f_o

Explicitly adding the System.Management assembly reference to my project

Getting system information by querying into the Windows Management Instrumentation system isn’t that difficult. Setting up the project to use the namespace was out of the ordinary – you have to explicitly add the reference to the System.Management namespace assembly to the project. There will be no help from the IDE with this. So you have to go to the Project properties page, click on References in the left column, hit the Add button, click on Assemblies->Framework in the left column, go down to the System.Management namespace and make sure the checkbox is checked. The same goes for the System.ServiceProcess namespace if you’re going to look at the running services as I have.

Basically, I’ve been working off of Microsoft code examples to get to where I am with this. To query WMI you set up and use a ManagementObjectSearcher class with your query and then iterate over the results. The sample application turns the query results into a List of string Dictionaries. Most of the time you’ll want to do a custom query to retrieve the specific information you desire instead of returning entire classes of information the way I have in the example application. Also, the queries take time more time than you might be used to, and this may become a problem. Using a separate thread to run your queries will improve response time. For instance I get a ContextSwitchDeadlock Exception if I do not run the Product query on a separate thread.

Why do the application at all? The one problem I have had is remembering the exact members of the different WMI classes I am querying for. The example app returns the entire class, or array of classes, with null values turned into empty strings for reference sake. It should be enough to get anyone started with building and testing the exact query they need.

There are dozens of scenarios where you would want to glean a bit of information from the System.Management namespace. Hopefully this example can help you on your way.

Download Links:

MachineInfo.exe

Entire Project on GitHub

References:

Standard
Analyze-It, Browser Extension, Google-Music-Search, Google-Open-Storage-Search, Google-Translate-It, Internet Explorer, Javascript, Look-It-Up, Plurk-It, Share-It, Windows

IE11 Menu Addons – New Version – 1 – Happy New Year!

New Internet Explorer 11 Menus Version


This release basically fixes a few bugs and adds Google Music Search to the menu. I’ll be using whole numbers from now on on these installers (just makes things easier). I had to remove tumblr from the menu as their format changed (no more sharing with a GET request). Fixed the Fetch and Guess tools to be compliant with their new versions – so they should work properly. The spaces in query bug in Google Open Storage search was fixed – so multi word queries work properly.

Download and Install IE11 Menu Addons for Windows 7, 8, and 8.1

New Version Completed – Read and download from here.

If you’re paranoid about the download – the hash values for the file are listed on the Repo page.

Standard
Windows

This is My Take on Windows 10 Technical Preview

New Start Menu

I had the opportunity to try out the Windows 10 Technical Preview recently and I was happy to see that the Start menu has returned with a facelift of sorts. The Start menu on Windows 8, as we all know, was changed to suit a touch interface. This was really great for their premiere surface tablet line up – but for desktop users without touch functionality this left a lot to be desired.
Personally, I do far too much on my system to even be able to rely on a touch interface at this point. The keyboard and mouse will not be going away any time soon in my life. Its shameful that Microsoft made the assumption that everyone would prefer that type of, non-selectable I might add, interface. Why shameful? I learned user interface design from Microsoft and MSDN while I was learning Visual Basic 6 eons ago – they have a tremendous investment in it that was ignored in Windows 8 (unless you’re a tablet user that is).

Application Menu Scrolls – Live Tiles Never Disappear

Enough of my ranting; Microsoft is fixing the Start menu problem now. Albeit, you’ll have to pay for a new version. There are other, less spectacular improvements on the way as well.
Windows users will have the opportunity to set up multiple desktops and switch between them. Granted, most Linux users have had this feature enabled on their desktops since the dark ages – now Windows has it.

Multiple Desktops Now

Window snapping has also been improved with selectable stacking (or tiling) with more than two windows. In the preview version I was using there was gaps between the snapped windows that made it less desireable. I have to assume that this will be remedied by the release date however.
I would have really liked to put Windows 10 through a couple of months of hard usage but my Nvidea drivers refuse to install as the version number is unrecognized by the driver installer. So I shouldn’t say I had the full “user experience” when I tested it. (Everyone knows – no video drivers = poor computing experience). Still, overall, it ran as well as Windows 8 on my box.
Windows 10 is still a work in progress. In my opinion it has a long way to go before they should actually call it a new version. It’s still Windows 8 with a facelift that suits desktop users in other words.
The technical preview is requesting that you (the tester) submit your views and opinions as you use it. That’s probably the most important improvement – the user opinion factor. So if you have an extra box laying around that you use for testing – try it. Put your two cents in and try to make the OS a bit better in the end.

Standard